Wednesday, December 31, 2014

Christmas in the Lafayette Dollhouse


Before the twelve days are up, I thought I should post some images from my small, "finished" dollhouse, the Lafayette model. The floor of the front room is littered with toys under the tree, including a baseball bat, a sled, a red coaster wagon, a drum and—um—a dollhouse.


The imaginary inhabitants apparently did more baking than me this Christmas. On the table: sugar, flour, eggs, milk, cookie cutters, a cookie tray, a rolling pin and a sifter. One presumes that the butter is in the churn.


There's a writing table in the bedroom. It's piled high with books and letters and a leftover teacup.


The second upstairs room has now turned into a sewing room, with overstuffed bags of wool and half-finished projects. But at least I have some cleaning supplies for tidying up the place.

Sunday, December 28, 2014

Free Faux Argyle Toque Knitting Pattern


This is the one piece of knitting I did for Christmas this year, and I simply made up the pattern as I went along. After knitting, I felted it for extra warmth.


Difficulty level:
  • Beginner to intermediate

You will need:
  • 1 skein Noro Kureyon (I think this is colour #40) or equivalent yarn
  • 1 set 16" cicular needles (4 mm or correct size to obtain gauge)
  • 4 double-pointed needles (4 mm or correct size to obtain gauge)
  • Row marker (can be a loop of contrasting yarn placed on needles.)
  • Tapestry needle with large eye

Gauge:
  • 17 stitches x 21 rows = 4" square

Abbreviations:
  • K = Knit
  • P = Purl
  • K2Tog = Knit two stitches together

Directions:
  • Cast 80 stitches onto circular needles. Insert row marker.
  • Rows 1-12: Knit in the round
  • Row 13: (P1 K9) Repeat to end of row.
  • Row 14: (K1 P1 K7 P1) Repeat to end of row.
  • Row 15: (K2 P1 K5 P1 K1) Repeat to end of row.
  • Row 16: (K3 P1 K3 P1 K2) Repeat to end of row.
  • Row 17: (K4 P1 K1 P1 K3) Repeat to end of row.
  • Row 18: (K5 P1 K4) Repeat to end of row.
  • Row 19: (K4 P3 K3) Repeat to end of row.
  • Row 20: (K3 P5 K2) Repeat to end of row.
  • Row 21: (K2 P7 K1) Repeat to end of row.
  • Row 22: (K1 P9) Repeat to end of row.
  • Row 23: Purl entire row.
  • Row 24: (K1 P9) Repeat to end of row.
  • Row 25: (K2 P7 K1) Repeat to end of row.
  • Row 26: (K3 P5 K2) Repeat to end of row.
  • Row 27: (K4 P3 K3) Repeat to end of row.
  • Row 28: (K5 P1 K4) Repeat to end of row.
  • Row 29: (K4 P1 K1 P1 K3) Repeat to end of row.
  • Row 30: (K3 P1 K3 P1 K2) Repeat to end of row.
  • Row 31: (K2 P1 K5 P1 K1) Repeat to end of row.
  • Row 32: (K1 P1 K7 P1) Repeat to end of row.
  • Row 33: (P1 K9) Repeat to end of row.
  • Rows 34-45: Knit in the round
  • Now, begin to decrease; switch to double-pointed needles when hat becomes too narrow to knit easily on circular needles.
  • Row 46: (K2Tog K8) Repeat to end of row. (=72 stitches)
  • Row 47: (K2Tog K7) Repeat to end of row. (=64 stitches)
  • Row 48: (K2Tog K6) Repeat to end of row. (=56 stitches)
  • Row 49: (K2Tog K5) Repeat to end of row. (=48 stitches)
  • Row 50: (K2Tog K4) Repeat to end of row. (=40 stitches)
  • Row 51: (K2Tog K3) Repeat to end of row. (=32 stitches)
  • Row 52: (K2Tog K2) Repeat to end of row. (=24 stitches)
  • Row 53: (K2Tog K1) Repeat to end of row. (=16 stitches)
  • Row 54: (K2Tog) Repeat to end of row. (=8 stitches)


  • Break yarn, leaving at least a 15" tail. Slip remaining 8 stitches onto the tapestry needle and bind off the closing snugly, weaving the end of the thread in and out around the top two rows of knitting until it feels completely secure. Weave in any loose tails of thread.


  • This is what it looked like when I finished knitting it. I then washed it with a load of other laundry in cold water and dried it on low heat, also with a load of laundry, in order to felt it, stopping the cycle occasionally to make sure it didn't shrink too much. This step is optional, but Noro Kureyon felts nicely, and the hat will be warmer if it's felted.

    How Did I End Up With the Westville Dollhouse?


    I feel an explanation is in order. I never intended to get myself a second dollhouse. However, while I was shopping Kijiji for a Christmas present for my niece, I came upon an ad from someone not too far from me who was selling a very slightly damaged version of the Greenleaf Harrison dollhouse, an opulent six-room Tudor dollhouse (pictured below), for just $30. I fell in love with it.

    I immediately contacted her, and started the process of arranging to pick it up, but apparently someone with a similar name was doing the same thing, unbeknownst to any of us, and the seller let the house go to her without realizing she actually had two buyers.


    I was disappointed, and frustrated that I had not been more proactive about getting it. So when another nice, inexpensive dollhouse popped up on Kijiji, mere blocks from my home, I pounced on it at once. The images above and below show what it looked like when I brought it home. Call it my rebound dollhouse.


    It's another Greenleaf kit, called the Westville, and it's based on a real home in Westville, New York near the Canadian border. The architectural style is Carpenter Gothic, which was common from 1840 to 1870. The house has four rooms plus an attic; you could subdivide one of the top-floor rooms if you wanted to.


    The kit was nicely built, but many of the "extras", like window frames and panes, were apparently left out. Also, there are a few too many patterns of wallpaper for my taste. In short, a fun fix-up. Because I've been working on my niece's house, I haven't spent too much time on this one, but I did build a shelving unit under the stairs and fabricate a cupboard door like the one that would have come with the original kit.


    Although most of the furniture that came with this house has ended up in my niece's dollhouse, it seems I already have quite a bit of other furniture, including a stove, dry sink and ice box for the kitchen.


    I've done just a little bit of paint touch-up on the outside of the house; here's the front porch. It will be fun to play around with it over time.

    Friday, December 26, 2014

    The Apple Blossom Dollhouse at Christmas


    So the recipient of the dollhouse was apparently delighted with her present. Here it is, lit up for Christmas, and with a doll girl on the porch.


    Here's the room the new dollhouse owner has designated as the nursery, the upper right room.


    The upper left room, now a bedroom. Tongue depressors make such excellent floors!


    My brother John took these pictures, and he also provided the furniture for the kitchen and the dolls. The kitchen  furniture fits in perfectly, although I'ms not sure why this looks so much like something out of a Stanley Kubrick film.

    Sunday, December 14, 2014

    The Victorian Dollhouse Surprise Christmas Present


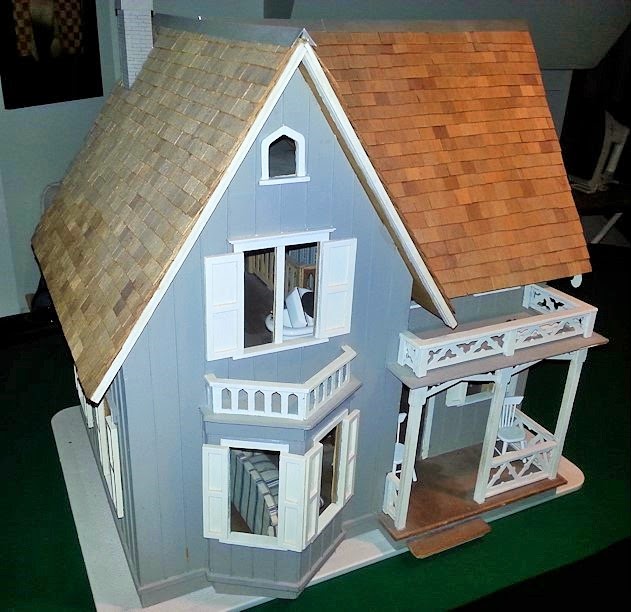
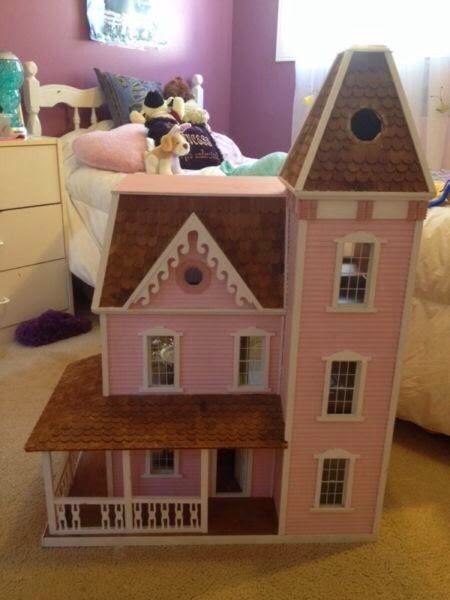
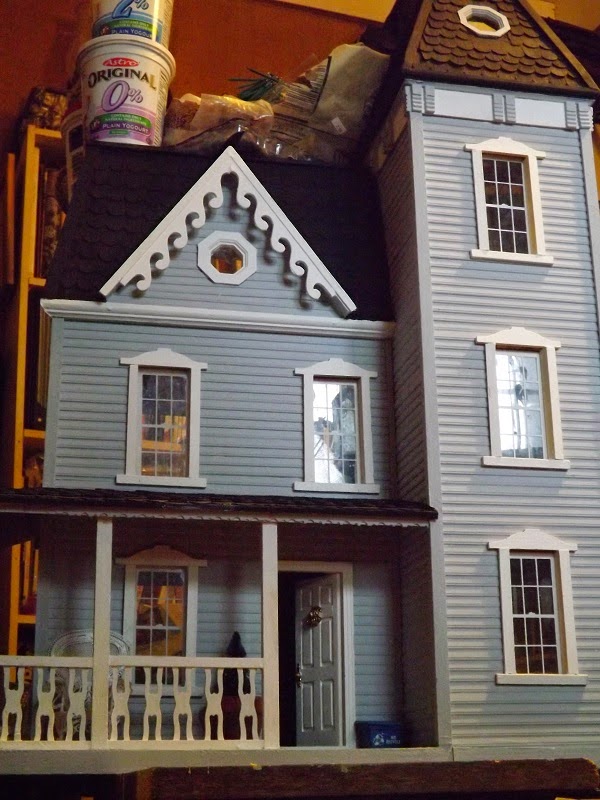
    I finally broke down and bought a really big Victorian dollhouse on Kijiji to give to my favourite 12-year-old doll collector for Christmas. This is what's called the Real Good Toys Lilliput Apple Blossom dollhouse kit, and it had been lovingly put together by a fond parent, sometime in the '80s I'd guess by the colour scheme. It's about three feet high by 28" wide.

    I took a GO train trip out to Whitby to collect it. I had a brief moment of panic when I suddenly thought I might end up carrying it back through Union Station during the mad rush of the Santa Claus Parade, but luckily I was one day early. Nonetheless, I made quite the spectacle.

    I had planned to take a cab home from the station, but when I realized I could actually lift it quite easily by crooking my arm inside and around the staircase well, I ended up taking the Queen streetcar, which engendered plenty of pleasant conversations and the fun of spontaneously giving a pink plastic doll bed to a very admiring little girl heading to the movies with her mom. She embraced it in both hands; I think she'll enjoy having it.

    It was a pretty good deal; it was about two-thirds the price of an unassembled kit bought new. It also came with a few piece of furniture. The original assembly job was careful, but there was a little damage: A missing piece of trim on the porch railing (bottom right), missing "glass" in the round window over the porch roof, and an entirely missing window in the turret, as well as a missing porch post at the back, some broken and missing shingles and some pieces that needed reglueing.


    I updated the paint job, and made it a little more grown-up and Gothic-feeling. My very sweet in-laws treated me to a trip to the Little Dollhouse Company to buy supplies to replace the missing window in the turret and the porch post. For the second hexagonal window, I cut a piece of clear plastic out of some bubble packaging, tucked it in the space and filled in the gaps with wood filler.

    More wood filler and glue, plus the dark paint job, fixed or hid most of the shingle damage. If you look very closely, you can see I added a "brass" doorknob and a lion's-head door knocker to the front door.


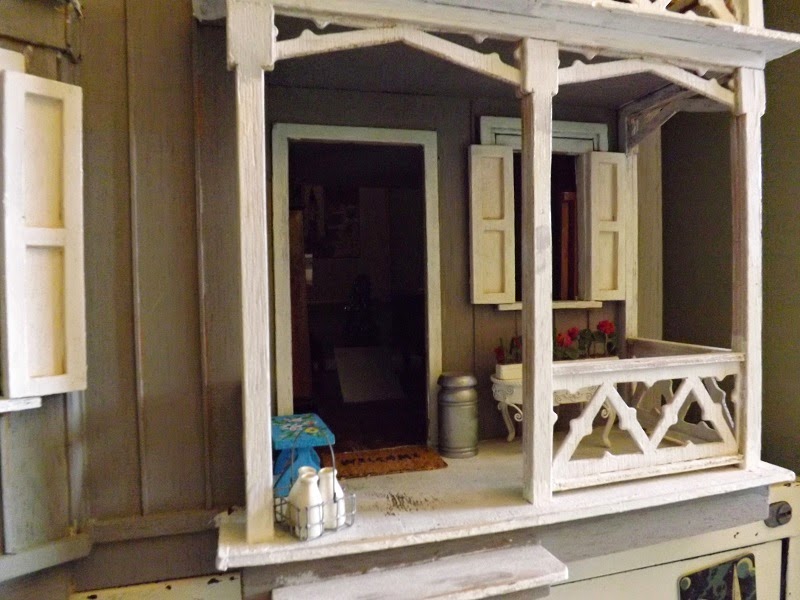
    In order to replace the missing bit of railing trim, I moved a section of railing that used to enclose this gap, and turned it sideways to give a "back" to the porch. That saved exactly one piece of trim, which I installed in at the front. The leftmost porch post is the one that was missing. I still have to add a lick of paint, I see.


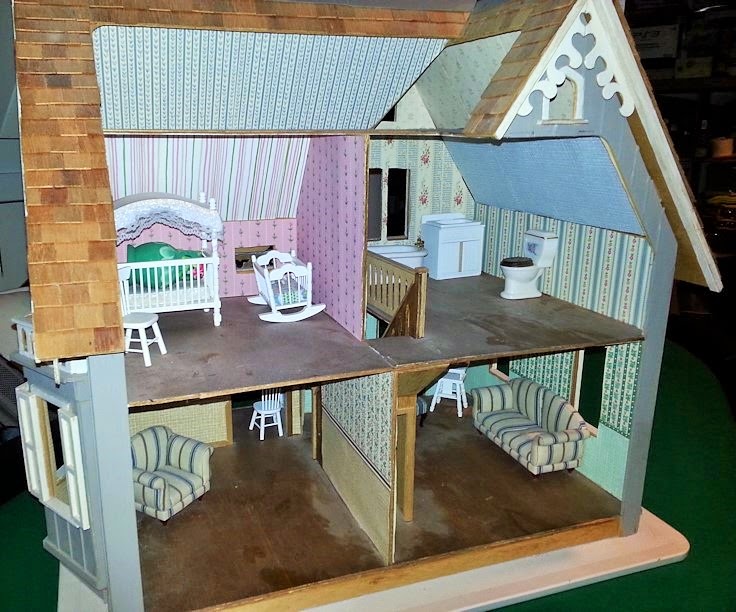
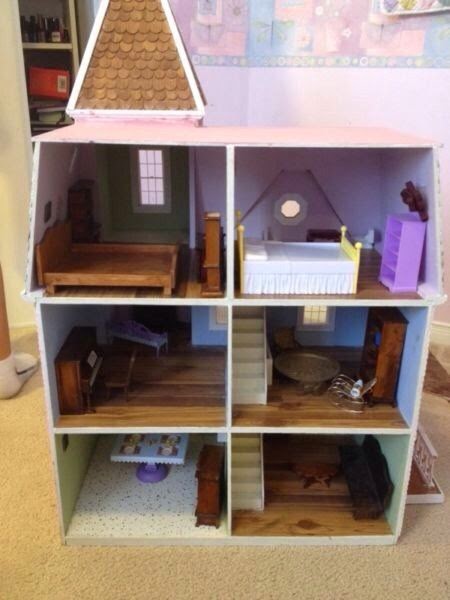
    Here's the original interior. The  floors were wood-grain stick-on vinyl, and the paint  job was fairly simple. After repairing a few broken bits, I kind of went to town. In fact, I'm not quite finished yet, but this will give an idea as to where it's going.


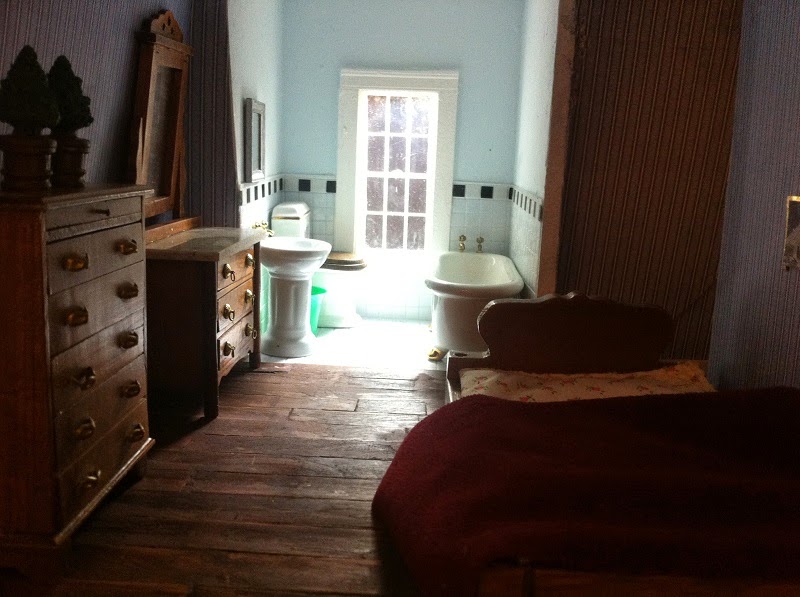
    The top turret room is now a bathroom with plastic "tiles" and a real mirror that I made with some little pieces of "frame" plus scrap plastic, paint and glue. The sink was part of the kind gift from my in-laws.


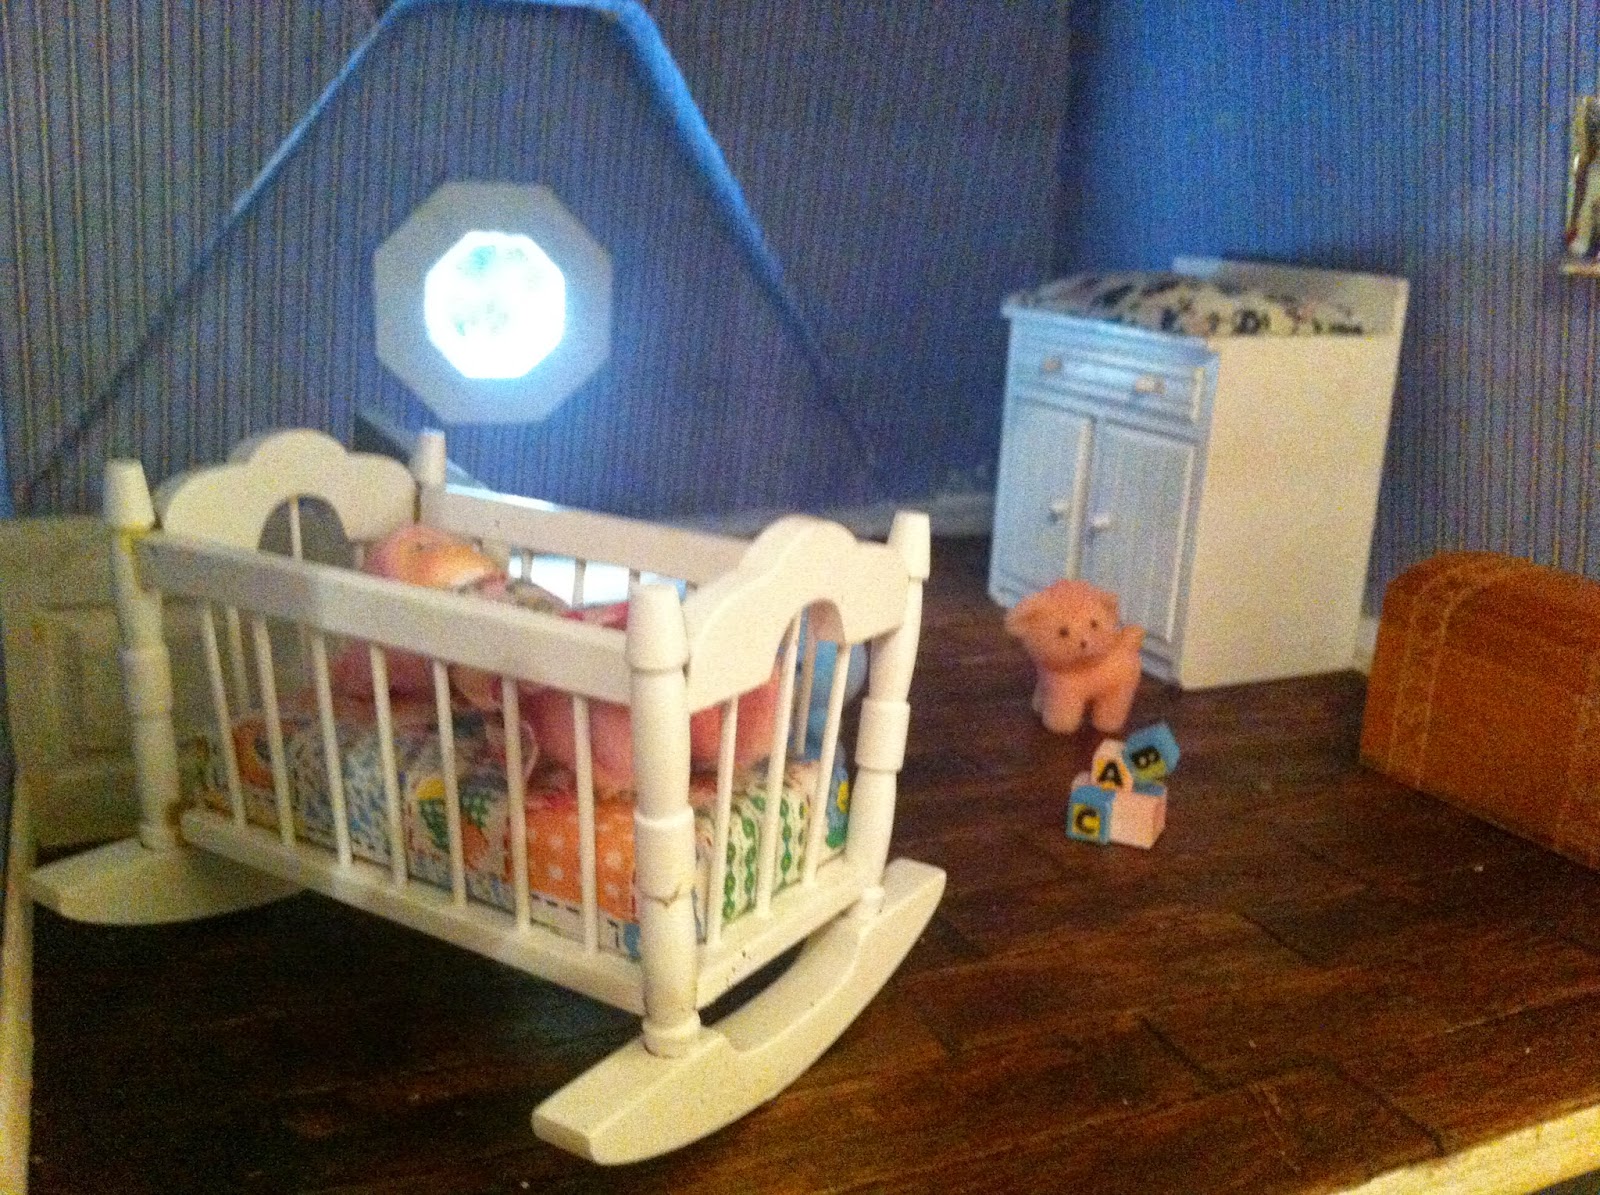
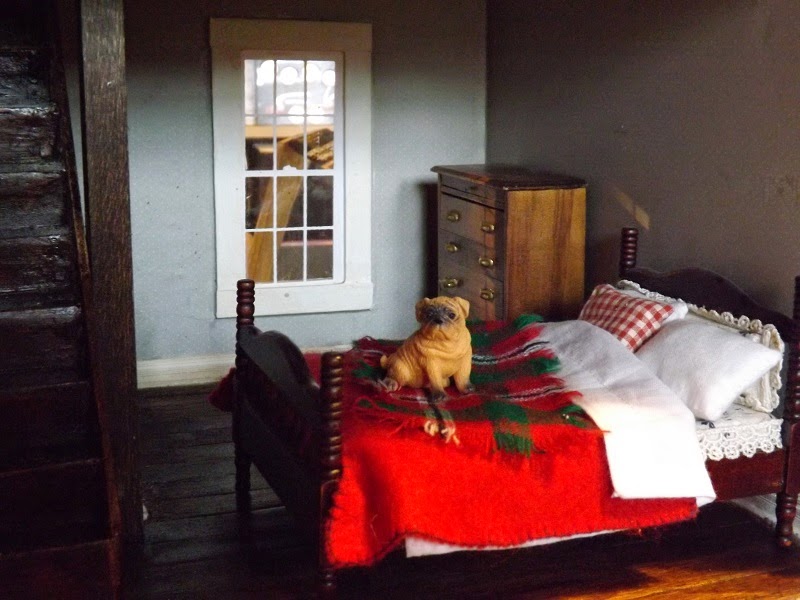
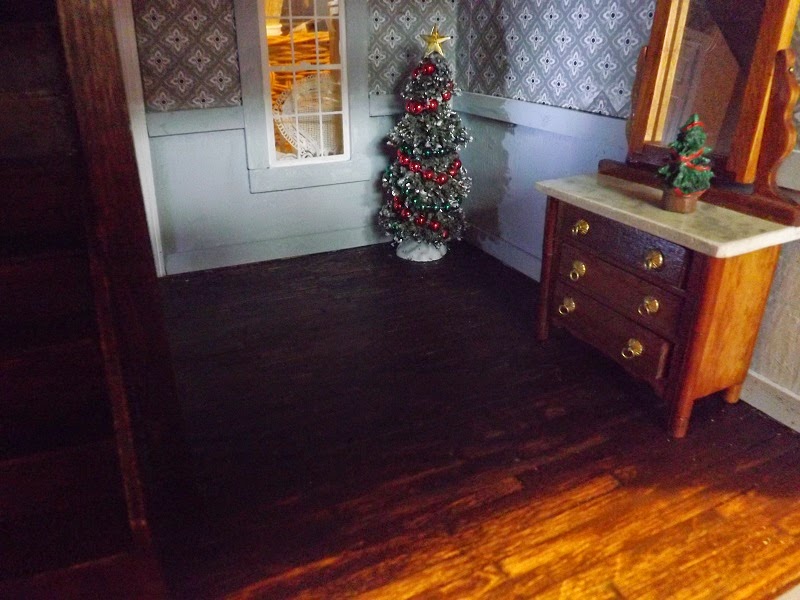
    This is the right-hand room on the middle floor. I applied tongue-depressor or stir-stick wooden floors in most rooms. I've learned a lot. They curl up like crazy when you first lay them down, but if you're patient, and sand and stain them when they're dry, they come out looking very realistic. While I was at it, I faced the stairs with tongue depressors and added posts. (I used real stain in a tiny jar from the hardware store.)

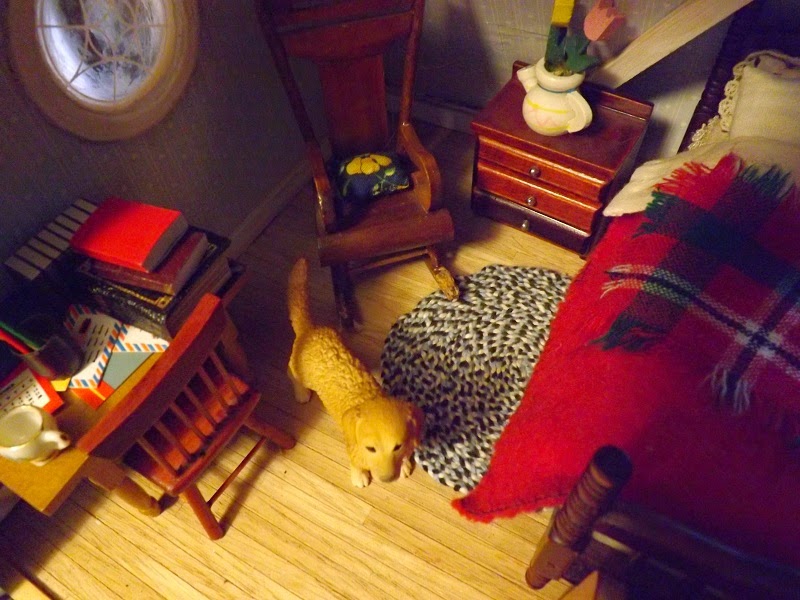
    The furniture has pretty much all come from little lots that people have been selling online. I was very pleased to find a pug, because the eventual recipient likes them a lot. I'm actually still looking for a couple of beds; this one is a "loaner" from my little house, but I'll be able to give her lots of other pieces to start out with. And half the fun is collecting and making your own furnishings, right?


    This is the bottom right room. The wallpaper is scrapbooking paper from the dollar store. The Christmas trees are dollar-store items (two for $1!) with stuck-on Mardi Gras beads for ornaments. I was delighted to find a little pack of stick-on glass stars, also at the dollar store.


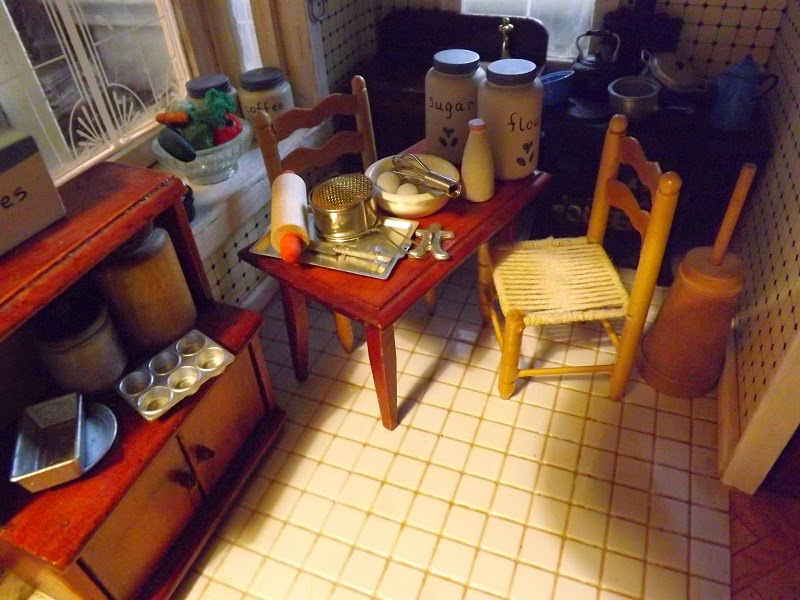
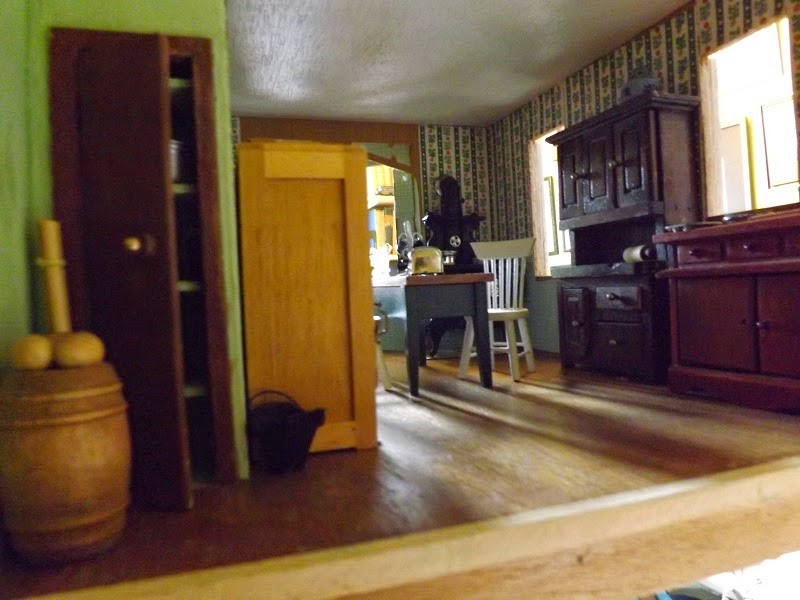
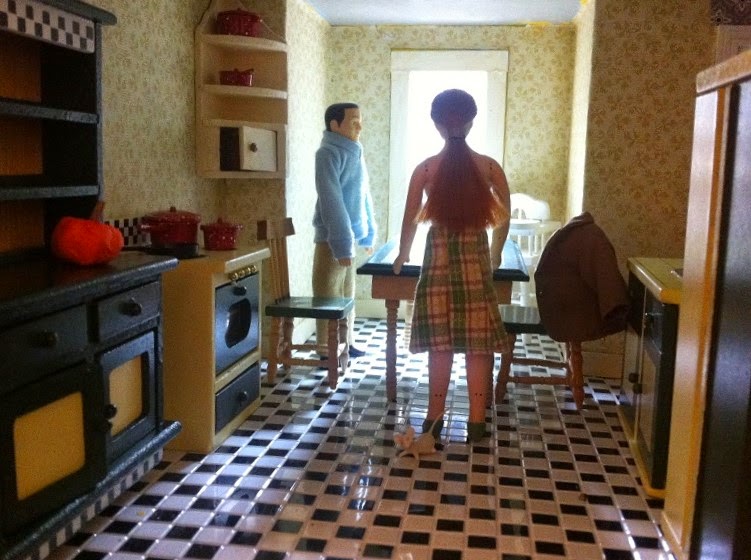
    The kitchen floor (bottom left room) was fun to tile. These plastic tiles come in one sheet, and they were also part of the generous contribution of my in-laws, as was most of the baseboard and some of the wallpaper that will go on the top floor. The corner cupboard was one of my odd-lot bits; originally dark wood, but now painted white and glued in place. The door opens.


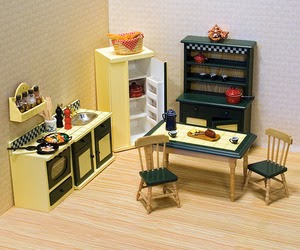
    My indulgent brother is springing for this set of kitchen furniture (and a small doll family). I can't wait to see how it will look in the space.


    This is the left-hand room on the middle floor. She already has a piano, so I'll keep this one, but I was quite pleased to find the nice sturdy and realistic-looking chair and sofa for her, second-hand. The white coffee table barely visible behind the armchair was just a broken tabletop; I added new legs and painted them to match.


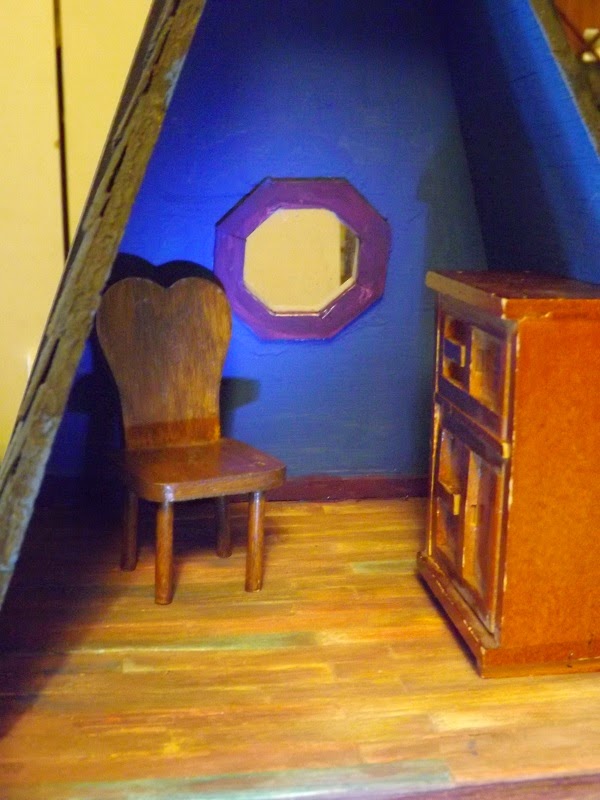
    Finally, the secret turret room. This is an option and the original builders didn't include it, so I carefully pried off the back of the turret and refinished the edges so it can now be lifted off to reveal the enchanted hidden room within. The floors were made with coloured craft popsicle sticks, then sanded and washed with paint, so they're faintly coloured blue, pink, yellow and so on. And see how nice the replacement hexagon window looks; thanks again to my kind benefactors!

    I thought the chair had a nice fairytale feel, and the chest opens like a puzzle box; it has "hidden" sliding wood pieces that lock it closed.

    I still need to finish the upper two rooms, but the floors are all but done (drying), and all that's really left is the wallpaper and baseboards, plus various last-minute paint touchups and extra glueing.

    I just hope she likes it!

    Tuesday, September 9, 2014

    Laura's Rug at Home at Last


    Just received a note and this picture from Laura, my dollhouse-loving cousin in England, who opened the envelope with the dollhouse rug today and immediately installed it into her arts-and-crafts dollhouse (as opposed to the cottage, the butcher shop or the Downton Abbey lookalike, of course). I am beyond  pleased to see it in such a nice spot.

    Saturday, September 6, 2014

    What's New in the Dollhouse?


    I met a very nice person named Michele via Kijiji this week who sold me four pretty little pieces of furniture, including this table with drawers, just the thing for the kitchen. She not a dollhouse person herself, she says, but her husband, who's interested in miniatures of another kind (railroads), apparently couldn't resist them, and I'm the beneficiary
    .

    This nice white dresser is another of Michele's pieces. I made the blanket out of a spare bit of felt, and the sheet and pillows from a fine linen table napkin. The braided rug was made simply by braiding three colours of cotton embroidery floss together, then sewing them into a flat coil (essentially the method for making any braided rug; just very small.)


    The flowers under the window are sitting on a short table with drawers, also courtesy of Michele. Not shown among her contributions is a wooden corner cabinet.


    I bought this Schleich golden retriever on impulse. I think he looks right at home. The sewing machine was a spontaneous present from my very serious dollhouse friend Susan. Only problem is I now want to get a dressmaker's dummy to go with it.

    Tuesday, September 2, 2014

    Another Dollhouse Rug


    I've been at it again – for about three years. This dollhouse runner carpet is for a family member dollhouse enthusiast who doesn't yet know it's coming to her. Once again, the pattern is from Needlework in Miniature by Virginia Merrill and Jean Jessop. I think it took about 75 to 100 hours of spare time on buses and in front of the television, but all the materials were things I had around the house, so it's a bargain... right?

    Saturday, July 5, 2014

    A New Sign for the Farmers' Market Garden


    In honour of our upcoming day celebrating pollinators at my local farmers' market, I got out the dollar-store paints again, sanded down a few bits of leftover wood and made this sign to promote milkweed awareness in our children's teaching garden. You can't quite see it, but there are little floating tufts of painted milkweed fluff floating across the image.

    Tuesday, June 3, 2014

    Tardis Socks for a Whovian


    These Tardis socks are slightly modified from a pattern by Gina Waters on Ravelry. I don't much enjoy colour work, but in this case I think it's worth it. And of course, they are bigger on the inside.

    Wednesday, March 26, 2014

    Spring Hat for Autumn


    A neighbour of mine is moving away to Denmark, and she gave me some of her wool stash last week to lighten the moving load. A few days later, I found out that another neighbour's baby has been born. Actually, Autumn was born six months ago, but this has been such a difficult winter that we haven't seen most of our neighbours for months

    In any case, knitting was clearly called for. This is the One for Two hat by Elena Troshina, posted free on Ravelry. It's so named because the design includes sizing for an adult as well as a baby. The yarn came without a label; all I know is it's synthetic, and may well have come from some Scandinavian source.

    Suffice it to say that I found it way more challenging than I expected. I had to count just about every single stitch, and it's full of mistakes. I like to think the lace pattern is so complicated that no one will really notice. And anyway, the colours are very pretty, as just about everybody said who spotted me working on it.

    Thursday, January 2, 2014

    Not Quite What I Expected... The Howl Cowl?


    Okay, so a few weeks ago I posted a pattern for a cowl. It was supposed to be a Christmas present for my sister. Since I had a bit of wool left and nothing to do with it, after I posted the pattern, I went back to the original cowl and knitted a bit more, so it was several inches wider than before.

    Did my sister like it? Well... she did find a use for it. Meet Paco, the cowl-wearin' boxer.